February 8, 2012

Chocolate Covered Strawberry Bites

I recently had a party where I needed some sort of dessert. I didn't want to bake, and I didn't want something straight off the shelf.

While I was wandering Cost Plus World Market the day before the party, I saw this cool toothpicks with knotted bamboo at the decorative end. And it struck me (an idea - not the toothpick): I could do a dessert skewer!

Thus, Chocolate Covered Strawberry Bites were born.
Ingredients:
Strawberries - cut into halves or quarters, depending on size
1 Sara Lee Pound Cake - cut into bit-sized cubes
Candy chocolate (or chocolate chips and a spoonful of Crisco)

1. Skewer alternating chunks of pound cake and strawberry
2. Melt chocolate in microwave - stirring often.
3. Drizzle chocolate over skewered food (skewers should be placed on wax paper or something similar for this step).
4. Let set.


Dinner Braids

I was bouncing along Pinterest one day recently when I came across this idea to stuff dinner inside a bread braid. I thought about how lazy I am when it comes to baking breads. And how generally lazy I am in making dinner when I have no other adults to feed any give night. So, I immediately wrote off the bread braid idea.

One night while staring at my fridge - praying a fully prepared dinner would randomly show up on a shelf - I noticed a tube of Pillsbury crescent dough. You know, the kind that rolls out in one whole sheet. And that's when I realized I, too, could be fancy!


Bread Braid:
1. Preheat oven to 375
2. Unroll crescent dough. Roll out or press out slightly with fingers.
3. Fill center third with whatever filling you want (see below for ideas)
4. Make cuts about an inch apart along the remaining two-thirds of the dough.
5. Braid pieces over each other.
6. Bake for 20-25 minutes.

Simple, right?
Isn't it pretty?

Filling Ideas:

- Ham and cheese
- Pesto, mozzerella & sliced tomato
- Peanut butter, banana, and jelly

- Small meatballs, marinara, mozzerella
- Pizza fillings
- Grilled veggies and cheese
- Taco fillings

Go Try it. See how awesome it is. Everyone will think you're fancy, too!
If you try any other fillings, let me know! I love new ideas!

Brownie Bottom Cupcakes

The premise: A cupcake with a layer of brownie on the bottom

The reality: A cupcake with brownie on the bottom

Here's my attempt at here. I'd say it worked out. It was yummy and easy to make. Two boxes of mix. Twice as many cupcakes as normal. All around, it's a simple, lovely way to make a "fancy" cupcake.


Rolos Butter Bars

I'm addicted to a blog called Cookies and Cups. This chick makes super yummy looking desserts. I'm a fan. I haven't tried everything on her blog, but I have stared at the screen and drooled for hours. Of the few things I've made, they've been winners...

Except this one:
The blogger did a series on desserts using cake mixes. I'm not a purist. Cake mixes rock my world. So, I showed the pic of the Rolos Bars to my officemate and he started drooling. So I made them. And they weren't that exciting. They tasted an awful lot like cake mix and Rolos. I guess I imagined a buttery, caramelly, chocolately goodness. And it just wasn't that.

I know I didn't botch the recipe (read it - you'll see why you can't botch it.) And I know the author of Cookies and Cups knows her stuff. But even when you're the best whatever-er in the world, you're going to make something less than a homerun every once in a while.

Now, I must get off the computer before I drool over her other blog entries.


Quick and Easy Appetizers

For years and years I've gone to this easy-peasy appetizer recipe for all my party needs. I throw everything in a crockpot and then just leave it to do its thing while I get ready for the party.

Cocktail Meatballs:
Put into corckpot 1 jar (10oz) of chili sauce, 1 jar (12 oz) of grape jelly, and one package of frozen, cooked meatballs or lil smokies. Set crockpot to low for at least two hours.
Serve from crockpot with slotted spoon or toothpicks.

Moosetracks:
Why not put both meatballs and lil smokies in the crockpot? It's yummy and is a good source of giggles for the right (immature) crowd.

January 21, 2012

Anniversary Gift

The day after my 9th wedding anniversary I wandered through the journal/gift section of Barnes and Noble and picked out a journal similar to the one here.

Starting that very night, I started a journal for my husband.
The first page was a 10th anniversary love letter, explaining what the journal was and why I was doing it.
Then, every night of our 10th year of marriage, I wrote a journal entry. Most were short and sweet, some were long and wordy. But each one was a declaration of my love. And I always made the subject of the entry something that either he did, didn't do, said, or even something I saw/heard that reminded me of him.
The journal turned into 365 expressions of my love. Someday the only thing I could write was "The text message you sent me today made me pause for a minute in the middle of my crazy work day and remember why I work so hard when I'm away from home."
Other days, when we weren't communicating exactly as the perfect married couple should, I wrote something along the lines of "We're not happy with each other right now. In fact, I'm pretty unhappy with you. But that's why I'm writing this. No matter how frustrated I am with you, I know the feeling is this strong because I love you that much."
On our 10th anniversary, I wrapped up the journal and handed it over.
Still, almost a year later, Mr Moose will pull the journal out and read the words I wrote well over a year ago and understand the many different ways I love him and appreciate him.
Now, the trick is - at least for me - to figure out what to get him for our anniversary this year. Any suggestions?

3 Minute Bracelet

I was test-driving another project when I decided to take a break and wander through my craft supplies. I found some grosgrain ribbon and another strip of ribbon/trim of huge flowers (easily found in the by-the-yard ribbon area of your local fabric/craft store). I grabbed my needle and thread and a snap closure. That's it. Easy peasy.

Step 1: Cut off excess mesh backing from the flower/embellishment

Step 2: Cut ribbon about an inch bigger than the wearer's wrist.

Step 3: Sew the flower/embellishment to the ribbon by hand.

Step 4: Sew each half of the snap closure to the ends of the grosgrain ribbon.

Step 5: Snap on the wearer's wrist.

Moose Tracks:
This really did take me three minutes to put together.
The sewing doesn't need to be amazing or precise (thank goodness.)
I'm going to be making another one of these in a day or two because I want to see how it reacts with a spray or two of fabric stiffener.
I also want to see if it works better with some other form of closure. The snap closure works great, but I'm too lazy to really sew it down to make sure it doesn't come back up.

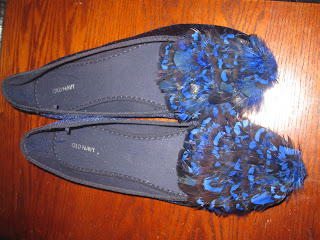
DIY Feather Flats

All over Pinterest I've seen people pinning heels with trendy feathers attached in different ways. And I've loved them all. But I don't wear heels - for a multitude of reasons. So, my brain started churning and this is what I came up with: Feather Flats.
Materials:
Two feather fascinators (easily found in the jewelry/headband making section of your favorite craft store)
A pair of color-coordinating cloth flats (see Moose Tracks for thoughts on leather flats)
Sewing thread in a coordinating color
Heavy-duty needle


The feathers I found are the type used to make your own headband. The are glued to a backing and have loops the headband slides through.


Step 1: Remove any sort of decoration on the show in the area where you want to apply the feather. Use a seam ripper or small scissors.

Step 2: Using the needle and thread, sew the feathers to the shoes.

Step 3: Show those babies off!

Moose Tracks:
I needed a thimble to help push the needle through the shoes and the feather. It wasn't difficult, but it's painful to push a sewing needle with bare hands.
If I can find some skinnier feathers (in a color/pattern I like, of course), I'd like to try wrapping/sewing the feathers around the heel of the flat.
I'm not a seamstress. I'm a lazy crafter. Because I used the right color blue thread, you couldn't tell how well I did or didn't sew. I made sure to get the edges of the feather fascinators and didn't worry about the center.
I did learn that any sort of large space between stitches results in a weird sensation on the foot.
If I'd had leather flats I'd probably have tried attaching the feather fascinators with some sort of adhesive cement that works on fabric and leather. Maybe I'll try that next time.
My total investment for these hip, trendy shoes was $9 for the flats and $4 for the feathers. So, pretty cool shoes for $13, right?

Last-Minute Creamy Penne with Chicken & Broccoli

I have young kids. Two beautiful boys. And as much as I love them, I'm starting to notice that they depend on me. Greatly. Like how they want dinner every night, even though they were fed lunch, breakfast, and a snack or three. They still want dinner. Why is that?!
Well, until I can solve the problem of them having to eat so regularly, I chose to work on the problem of what to feed them. Some nights I just don't have it in me to make a four course meal for two little guys (hubs works nights. I don't feed him during the week, in case you were wondering.)
Last week I threw together some stuff and it turned out to be a pretty good dinner.

Last-Minute Creamy Penne with Chicken & Broccoli

2 chicken breasts (no need to be thawed)
1-2 Tbsp Olive Oil
Salt & Pepper to taste
2+ cloves minced garlic (or equiv amount garlic powder)
1 - 2 C broccoli florets, frozen
2-3 C Penne Pasta
1 C cream, half and half, or milk
2-4 Tbsp butter
1/4 C parmesean cheese
Diced tomatoes for garnish
Parsley for garnish

Dice frozen chicken into bite-sized pieces.
Heat olive oil over medium high heat. Add chicken, salt, pepper and garlic.
Brown chicken.
While chicken cooks, boil water for pasta.
Cook pasta and broccoli according to directions on pasta box/bag.
Just before pasta's done, scoop 3-4 ladelfuls of pasta water into chicken.
Add cream, butter and parm.
Stir until sauce thickens slightly.
Add in drained pasta and broccoli. Stir to coat.
Sprinkle with minced/julienne/chopped parsley and fresh diced tomatoes.
Enjoy!

Peach Bread (Canned Fruit)

Peach bread. It's made of yum.
Have I told y'all I live at high altitude? It means some of my quick breads fall in the middle. But they're still baked wonderfully and are super yummy. I like to think of it as a feature of quick breads I make.
Without further ado, I bring you another bread recipe for canned fruit.
3 eggs
2 C sugar
2 tsp vanilla
1 C vegetable oil
3 C flour
1 tsp baking powder
1 tsp salt
1 tsp baking soda
3 tsp cinnamon
1 tsp orange zest/dried orange peel
2 C diced peaches, drained
1/2 C walnuts (optional)

Preheat oven to 350
Grease and flour bread pans (this recipe makes the equivalent of 2 8x4 inch loaves).
Beat together all wet ingredients.
Add in dry ingredients until combined.
Fold in peaches.
Pour or scoop batter into prepared pans.
Bake at 350 until a tester inserted in the middle comes out clean.

Note: For 8x4 loaves it's about an hour. For mini loaves I tend to get it done in just under 35 minutes. Muffins take 18-25.

Moose Tracks:
When you find something that works - stick with it. Peach bread is a variation on a theme of the Ginger Pear Blueberry Bread. See what I did there?